Introduction . . .

Showing posts with label Assignments. Show all posts

Thursday, August 21, 2014

Removal Graded #1


Tuesday, August 19, 2014

Photoshop: Healing Brush Practice

Remove all vertical poles/ signs using the healing brush.
After you get the first part approved, then remove the car.

Tuesday, February 25, 2014

Digital Painting: Grey Scale / Value Scale

LEARNING TARGETS:
»  I can use rulers and guides in Adobe Photoshop.
»  I can blend black to white SMOOTHLY using a brush in Adobe Photoshop. 
»  I understand the responsibilities and ethics associated with publishing to the internet
 
EXPECTATIONS:
»  CREATE:  Paint a Grey Value Scale using Photoshop in a 5 X 7 inch document at 300 DPI. 
»  REFLECT:  Document the whole process in your blog and reflect what you learned.


Create a new document with a resolution of 300 DPI, with a size of 5 X 7 inches. 

Using the ruler, setup 6, 1 inch squares, 1/2 inch from the edge.

Rulers


Create a new layer, label it Reference Layer, and fill in each square with the appropriate values.

GreyScaleBlend4   

It should look something like this.

GreyScaleBlend3


In a new layer, label it Blend Layer, create a rectangular value scale 1/2 inch below the top one.

GreyScaleBlend5


GreyScaleBlend2In the blend layer, blend the black smoothly to white.  Use a large brush with a soft edge and set the Flow to something low, like 1-4%.  Use the eye dropper to pick the value that you want to work with and blend.  Does that make sense? It should look like the sample below.


GreyScaleBlendS

Painted Sphere

LEARNING TARGETS:
»  I can paint a realistic sphere in Adobe Photoshop.
»  I can blend color SMOOTHLY to show a spheres volume in Adobe Photoshop.
» I can identify the important components of light & shadow : Umbra, Penumbra, Specular Highlight, Reflected Light, Core Shadow, Ambient Shadow, and Mid-Tone Value.
»  I can identify the direction of the light source and accurately paint the shadow in Adobe Photoshop.

EXPECTATIONS:
»  You are to repaint this reference image using Photoshop in a 5 X 7 document (@ 300 DPI) including the background, shadows, & specular highlight.
» All layers must be labels; post a screen shot of layers in blog.
 *Document in blog.

NEW VOCAB

Shadow Diagram3

imageimage

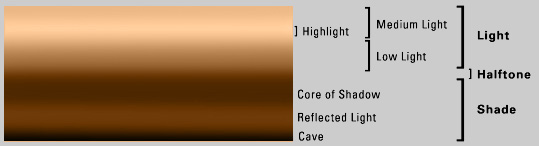
Umbra – (Latin for "shadow") The area completely obscured by object or the “Hard” shadows
Penumbra – The area partially obscured by object or the “Soft” shadows
Core Shadow -

Specular Highlight - This is a reflection from a light source and is the bright spot of light that appears on the surface of a 3d object. The smaller the highlight the shinier the surface, the larger the highlight the more the surface defuses the light.
Reflected Light – Is a faint light reflected or bounced back on the object from the surfaces surrounding it.

Mid-Tone – The tonal value mid-way between the highlight and shadow. Sometimes referred to as halftone.
Value – The gradation of tone from light to dark or of color luminosity
General Notes:

Paint the Sphere in these stages:

  • Copy, paste, and scale the reference image in the upper left hand corner. *Hold shift maintains an equidistant aspect ratio. Scale it and place it appropriately.
  • Using the Elliptical Marque Tool, draw a circle while holding down the {SHIFT} key. *Hold shift maintains an equidistant aspect ratio. Scale it and place it appropriately.
  • Create and label 6 new layers and use them accordingly.
    • Reference
    • Specular Highlight
    • Ground Reflection
    • Color
    • Key Shadow
    • Ambient Shadow
  • Paint the base color/value giving the sphere volume in the Color layer. *Use a layer mask.
    • Fill in mid-tone color first
    • Paint the reflected color in the Color layer.
  • Paint the Specular Highlight in the Specular Highlight layer. 
  • Paint the ground reflection in the Ground Reflection layer.  *Use a layer mask.
  • Paint the key shadow in the Key Shadow layer.
  • Paint the ambient shadow in the Ambient Shadow layer. 


Image Size:  Landscape 5 X 7 at 300dpi
spher

Wednesday, February 19, 2014

Animated GIF – Tutorial

LEARNING TARGETS:

» 
I can create a simple animated GIF using Adobe Photoshop.
»  I can create a complex animated GIF repeating walk cycle using Adobe Photoshop.

EXPECTATIONS:

»  You are to create a REPEATING animated GIF walk cycle.
»  The walk cycle should have at least a 5 image sequence.
»  The background needs to be clean and not distracting.
»  The GIF needs to be cropped to the size of the image.

*Document in blog.


Find a walk cycle and create a repeating animated GIF from it.   You must remove background.
Walk cycle.
wlk01
Repeating animated walk cycle.
Walking-man2

OR
Resources:
http://www.angryanimator.com/word/2010/11/26/tutorial-2-walk-cycle/

How to make an animated GIF tutorial:


http://creativetechs.com/tipsblog/build-animated-gifs-in-photoshop/

Tuesday, January 28, 2014

Photoshop Selection Assignment

LEARNING TARGETS:
»  I understand how to implement Photoshop’s selection tools and the tools attributes. 
»  I understand the responsibilities and ethics associated with publishing to the internet
 
EXPECTATIONS:
» CREATE: You are to remove the background from the Statue of Liberty - CLEANLY. Using the tools taught in class. 

» CREATE: You are to
remove the background from the this image, showing the Zebra only - CLEANLY. Using the tools taught in class.
 
»  WRITE: You are to document the entire process in your blog


  • Rectangular Marquee Tool vs. Elliptical Marquee Tool
    • New Selection
    • Add to Selection
    • Subtract from Selection
    • Intersection
    • Style
      • Normal
      • Fixed Aspect Ratio
      • Fixed Size
      • Feather
      • Anti-Aliased
  • Magic Wand
    • Tolerance
    • Contiguous
  • Single Row Tool vs. Single Column Tool
  • Lasso vs. Polygonal Lasso vs. Magnetic Lasso

Graded Assignment: Using the tools taught in class, remove the background from the Statue of Liberty - CLEANLY.
statue-of-liberty


Graded Assignment:
Using the tools taught in class, remove the background from the this image, showing the Zebra only - CLEANLY.zebra05%25255B4%25255D[1]


Monday, January 20, 2014

Headshot


LEARNING TARGETS:

» 
I can navigate to and open Adobe Photoshop.
»  I can identify & implement the liquify tool and its key features in Adobe Photoshop.
»  I have a basic understanding of layers in Adobe Photoshop.
EXPECTATIONS:

»  Using the liquify tool, you are to restructure a persons portrait using this reference image using Photoshop.
» The portrait should look "photo-real", but look like a completely different person.
» Duplicate the original image twice in a second layer so that you can toggle between the original and liquified version.
 *Document in blog.


Make sure you paste the image twice, this allows you to toggle between the original and the liquified version.  Label your layers. 

RESOURCES:

Dove Commercial – Ethics


Sean Armenta Covering the Liquify Tool

Photoshop Digital Cosmetic Surgery 101 by Sean Armenta


Portrait Pro  - Ethics
http://www.portraitprofessional.com/gallery/

Here is an guide to help you with what ever you need to know about the liquify tool.  
A Comprehensive Guide to Photoshop’s Liquify Tool

Monday, November 4, 2013

Haunted House Notes – Old Paint

Here is a great site for textures, it has everything from broken windows, old paint, to bad shingles.  you will have to create an account to be able to download any image, but it is easy and worth it.  Check it out -  http://www.cgtextures.com/
Untitled-12

To give it a bad/old paint job, first find a great image and then copy and paste it in the old house scene. 
Untitled-13

Scale it and fit it to the area you want to dirty up.  Something like this.  I used the distort tool and dragged the corners down to fit the scene.  Edit  –>  Transform -->  Distort
Untitled-7

You might have to move it around and trim it a bit until it looks right.
Untitled-15

With the magic wand tool, select the white area of the paint and delete it.  This should leave just the undercoating.  If it doesn’t have the right depth, you can give that layer some inner shadow.   Double-click the non-image side of the layer and when the menu pops up choose inner shadow.  I set my inner shadow size to 1 pixel.
Untitled-16

This is what I have so far.  I still have a ways to go, but it is looking good.
Untitled-17

Here is the image I started with.
Untitled-18

Tuesday, October 8, 2013

Photoshop- Haunted House Rubric

LEARNING TARGETS:
»  I can use all the tools I have learned to-date to edit a photos for a specific purpose, Digital Painting or Matte Painting.
»  I can plan / sketch out my house prior to starting the project
»  I understand the responsibilities and ethics associated with publishing to the internet
 
EXPECTATIONS:
»  You are to find 10 or more high resolution photos of a house with a 'classic' Victorian/Colonial style for the
    purpose of making it old, abandoned and haunted.  
»  Post all research images in your blog, noting your top 3 choices.
» Choose your favorite and check with me.  
» Sketch out 4+ concept designs on paper or in Sketchbook Pro, of your ‘haunted’ scene.
 
»  You are to document the entire process in your blog


It is all about Composition!  Rule of Thirds, Movement, Triangulation . . . How does your eye move throughout the image . . .

This is what I am looking for . . .

Haunted Example

 
This project is a culmination of everything you have learned to date. You will need to demonstrate these skills with the creation of an original work. Students are to find a high resolution photo of a house with a 'classic' Victorian/Colonial style and creep it out. The final image should portray a completely different mood, particularly abandoned/haunted. Minimal evidence of the original scene should be present.
 

Example

image

*This tutorial gives you an idea of what you will be doing . . . http://www.tutorialmagazine.com/tutorials/view/create_a_haunted_house_in_photoshop_10

And another one . . . http://www.tutoriallounge.com/2010/07/matte-painting-tutorial-of-tajmahal-using-photoshop/

And . . . https://tutsplus.com/tutorial/apocalyptic-city-street/?WT.mc_id=premium_psdtuts_ed

And  . . . http://www.3dtotal.com/index_tutorial_detailed.php?id=372#.UVRWojeyKzE

And  . . . http://www.3dtotal.com/index_tutorial_detailed.php?id=767#.UVRXUzeyKzE


Project Completion (50%)
is incomplete and contains many unfinished elements.
is incomplete and contains some unfinished elements and little evidence that project content supports stated objectives.
is incomplete and contains several unfinished elements, some evidence that project content supports stated objectives.
is completely finished and clear evidence that project content supports stated objectives.

Composition's Quality of Manipulation & Editing (20%)
is inappropriate and/or editing is poor in quality.
is appropriate and/or editing is poor in quality.
is appropriate and/or editing is good in quality.
is of high quality and/or editing is excellent in quality.

The Work's Originality (10%)
is a minimal collection or rehash of other people's ideas, images and inventions. There is no evidence of new thought.
is an extensive collection and rehash of other people's ideas, images and inventions. There is little evidence of new thought or inventiveness.
shows some evidence of originality and inventiveness. While based on an extensive collection of other people's ideas, images and inventions.
shows significant evidence of originality and inventiveness. The majority of the content and many of the ideas are fresh, original, and inventive.

Depth & Breadth of Project Content (10%)
No evidence that higher level thinking skills were used in the creation of this project.
Little evidence that higher level thinking skills were used in the creation of this project.
Some evidence that higher level thinking skills were used in the creation of this project.
Clear evidence that higher level thinking skills were used in the creation of this project.

Knowledge of Software (10%)
is not evident. Tools were used incorrectly.
is evident. Some of the tools were used correctly.
is evident in much of the project. Majority of the time, tools were used correctly.
is evident throughout the project. Majority of the time, tools were used correctly.


Possible House Types to Google?

Victorian House

Gothic Revival

Italianate

Renaissance Revival house

Queen Anne

Richardsonian Romanesque

Folk Victorian

Colonial Revival

Neoclassical house

French Revival house

Second Empire

Friday, October 4, 2013

Advertising Design

LEARNING TARGETS:
»  I can use computer graphic tools, graphic organizers, and design processes to help develop ideas,
     topics, or possible solutions for an advertising design solution - Pinterest, Inspiration, etc.
»  I can create thumbnail sketches of potential designs

»  I can use computer 2D graphic tools to create
possible solutions
»  I can use computer graphic tools to create a quality final advertising solution
»  I understand the responsibilities and ethics associated with publishing to the internet
 
EXPECTATIONS:
»  WRITE: Identify and re-write the task or problem (in your own words)
»  SKETCH: After reading the problem / prompt, take out  a clean piece of paper and sketch and/or
    write-up your initial thoughts and ideas. 
»  RESEARCH: Collect reference images, current advertisements, inspirational, examples etc. (Pinterest, folder)
»  ORGANIZE: Create a mind map that will help guide you for the prompt
»  SKETCH: Design thumbnail sketches of possible solutions
»  SKETCH: Create 3+ detailed sketches based on your thumbnails, specifications, and mind map. 
»  DRAW: Create a finished Logo and graphic design of your best design
(include orthographic views)

»  You are to create a blog using blogger.com to be used as a “Design Folder”
    for all your research
(use all “Design Folder” requirements)


THE ULTIMATE GOAL 

You are to create a finished logo and package design for a children’s energy drink.

Missile Energy Drink


PROJECT BACKGROUND

You are an advertising designer and your client is roc•et. A unique product, roc • et is the first energy drink aimed at elementary school kids.  Just like the big kids who have become dependent on high-calorie, high caffeine energy drinks like Red Bull, Monster, Rockstar and others — now little kids can enjoy a rush of energy in a juice box...just for them!

Assignment: Your job will be as follows: conceive, design, and execute a logo for roc • et.  First, create a logo for the drink. The required text for the logo is “roc • et”.  Logo design may be in full color and must not be a strictly typographic solution (it must incorporate some form of a graphic or illustration). Your logo design for this part can be any shape or size, but for the purposes of this project, your thumbnails should fit in at least a 4" square.  Your logo thumbnails should be NO LARGER than 4". Please remember, this DOES NOT mean that your logo should be square. If you choose to do a rectangular or oval shaped logo, you should adjust the size of your logo thumbnails accordingly. Above all, PACE YOURSELF.  The logo should represent the idea of an energy drink aimed at kids in a fun, energetic way. It should communicate instantly that kids are the target market. To this end, we are asking you to be as creative as possible in the time allotted. You will notice that we DID NOT supply you with a slogan or tag-line. You are expected to come up with one.  Also, should there be a mascot for the drink? A cartoon character? A celebrity endorsement? You decide. This is the creative portion of the competition. BE CREATIVE. Show us your absolute best ideas.  All images must be original in design.

Second, you will create a full color package design. Using the template provided show us what the front of your juice-box type package will look like Do not worry about ingredients or nutrition information on the side of the box. Use the template as provided. How will you make your design fit into the 3-D format? Can it be done in Illustrator? Can it be done in Photoshop? It is your job to use your proficiency with the computer, and your mastery of the programs to make it happen. If we told you how to do it....it wouldn't be much of a contest would it? Again, your design should communicate quickly and effectively. It should make kids scream in the grocery store until their mom gives in and buys the stuff.  Show us how creative you can be with it.


Your package design must:
• Incorporate the logo you have created
• Include some sort of slogan or tag-line
• Anything that makes your design REAL or BELIEVABLE. (web address, etc.)

Before you begin work on the composition on your computer, you must complete thumbnails.

SAVE the Package as your first name + “_” + second name + “_” + the word “logo”. 


Keep an eye on the time. PACE YOURSELF! The key to all of this is to finish in the time allotted.

Color: Full-color

Size: See instructions above for logo guidelines. Box template is provided

UNIT QUESTIONS:
How does design play a role in advertising? 
How does advertising affect society?

PURPOSE
To evaluate each ones preparation for employment and to recognize outstanding students for excellence and professionalism in the field of advertising design.

Time: 2 weeks
Subject: Logo Design and Package Design
Client: roc•et


Procedure:

  1. Read directions, look over all materials & evaluation sheet.
  2. Sketch 5 thumbnails EACH of the logo and box in proportion and in color. Logo FIRST. Box SECOND.
  3. Develop your designs for the logo and box in proportion and in color from your thumbnails on the computer.
  4. Create a PNG of the final version of your logo BY ITSELF. It should fit within a 5” x 5” box, (but it doesn’t have to be square.)
  5. Save it as your contestant first name + “_” + second name + “_” + the word “logo” If created in Photoshop, keep the resolution 300 dpi. Type set your Contestant Number in the upper right corner of the logo in 10 pt. Helvetica or equivalent. Print 1 copy.
  6. Create 1 full-size, final on the computer which has your logo incorporated into your advertisement. 

    Juice_Box

Download Full Size Image from MYP Resources on COLE.


Capture34


*Adapted from a SkillsUSA National Contest.


INVESTIGATE

WRITE: Before you do anything, you must fully understand what the task is, so that you are heading in the right direction.  You don’t want to start creating a project and realize that it is not answering the task that you were assigned.  (Assign a label of ‘TheProblem’ and ‘InitialResearch’)


SKETCH: After reading the problem / prompt, take out  a clean piece of paper and sketch and/or write-up your initial thoughts and ideas. Scan and post in your Initial Research.  (Assign a label of ‘InitialResearch’)


RESEARCH: Collect / research reference images, current designs, inspirational, blueprints etc. Basically find as many references as you need, which is at least 20+.  I call this phase, the “Virtual Cork Board” and have found that the best way to do this is to create a Pinterest page with all your resources.  This is not only a dynamic collection of resources, but it also retains the source information for later documentation.  (Assign a label of ‘InitialResearch’)

Here is a great Pinterest pinboard resource for advertising design ideas . . .  <<  Here  >>


ORGANIZE: Create a mind map that will help guide you for the prompt / problem.  Create a mind map that explores 3+ design options for the project. Each design branch should fully explore design characteristics and specifications.  (Assign a label of ‘InitialResearch’)

mind_map_bike_util1small

phone-attachements-mind-map-v11


TIP:
Most firms that hire you, expect you to go above and beyond what they are looking for.  First, it is important to give them exactly what they want, but also to share your expertise.  So if you come up with an idea that might not completely follow their specifications, share it with them.  They might not use it . . . this time . . . but your input as a design is invaluable. 

(Optional) If you come up with a great design that might not fully meet the specifications completely, share it with them anyways.  Create a 4th branch with this optional design. 


SKETCH: Design several thumbnail sketch pages of possible product design.  For each possible design, create a page of thumbnail sketches based on each of your designs from your idea map.  (Assign a label of ‘Design’) 

Here are some thumbnail examples, some are more elaborate than others.   Don’t be intimidated the examples, these are just supposed to be light sketches. 


Examples

05namco_ALL_ROUGH

Ocean_ideas

url4

walters008


SKETCH: Create 3+ detailed sketch based on your thumbnails, specifications, and mind map.  Basically you are draw 3+ detailed sketches where are more detailed version of your best thumbnail designs. You may have multiple pages . . .

Here are some thumbnail examples, some are more elaborate than others.   Don’t be intimidated by these examples, these are from professionals or post-secondary students. 


Grafikarna_logo_ideas_by_dzuro_by_designerscouch

ideas_2web

logo design

logo_ideas_v02

picture-11

Rocky_mountain_flute_templates

url


CREATE

DRAW: Create a finished Marketing Concept Sheet for your design (include orthographic views)

Here are some Marketing Concept Sheet examples, some are more elaborate than others.   Don’t be intimidated by these examples, these are from professionals or post-secondary students, but it will give you an idea of what I am looking for. 


Banzai-Energy-Drink

pack1a

spartan

pacific-hoists_branding-logo-design